![]()
![]()
![]()

1. Chapter 1: Getting Started.
1.1. Programming basics
Computers are programmable machines that process information by manipulating data. As the data can represent any real world information, and programs can be readily changed, computers are capable of solving many kinds of problems.
Programs are created in a programming language by writing a series of instructions into a text file. The files containing the program (source) code are translated into executable applications or software. Most programs are intended to serve as interactive tools for people referred to as users. Users interact with programs in many ways including:
-
Text user interfaces using the keyboard and a console.
-
Graphical user interfaces (GUI) using a keyboard, mouse, monitor, touch screen, …
-
Audio user interfaces using speakers and/or a microphone.
-
Combinations of all of the above along with emerging technologies like brain wave interfaces, 3D printers, virtual reality headsets, bio implants, …
1.2. Programming Languages and Environments
There are many different programming languages for programmers to choose from. Each language has its own advantages and disadvantages, and new languages gain popularity while older ones slowly lose ground. In this book, we use the Java programming language. It is popular in both academia and industry.
There are many different environments where a programmer may write and test Java. We will setup a few in this chapter, but use a wide variety throughout the semester.
1.3. Get Processing
Processing is a Java based coding environment for graphics. We use it throughout the semester as a context for real world coding.
-
Watch my video on installing, running, and turning in a Processing asg: https://web.microsoftstream.com
-
Install Processing: https://processing.org/download
-
Read the docs: https://processing.org/reference/#shape
Processing Asg 1.1
Processing Example Script
|
|
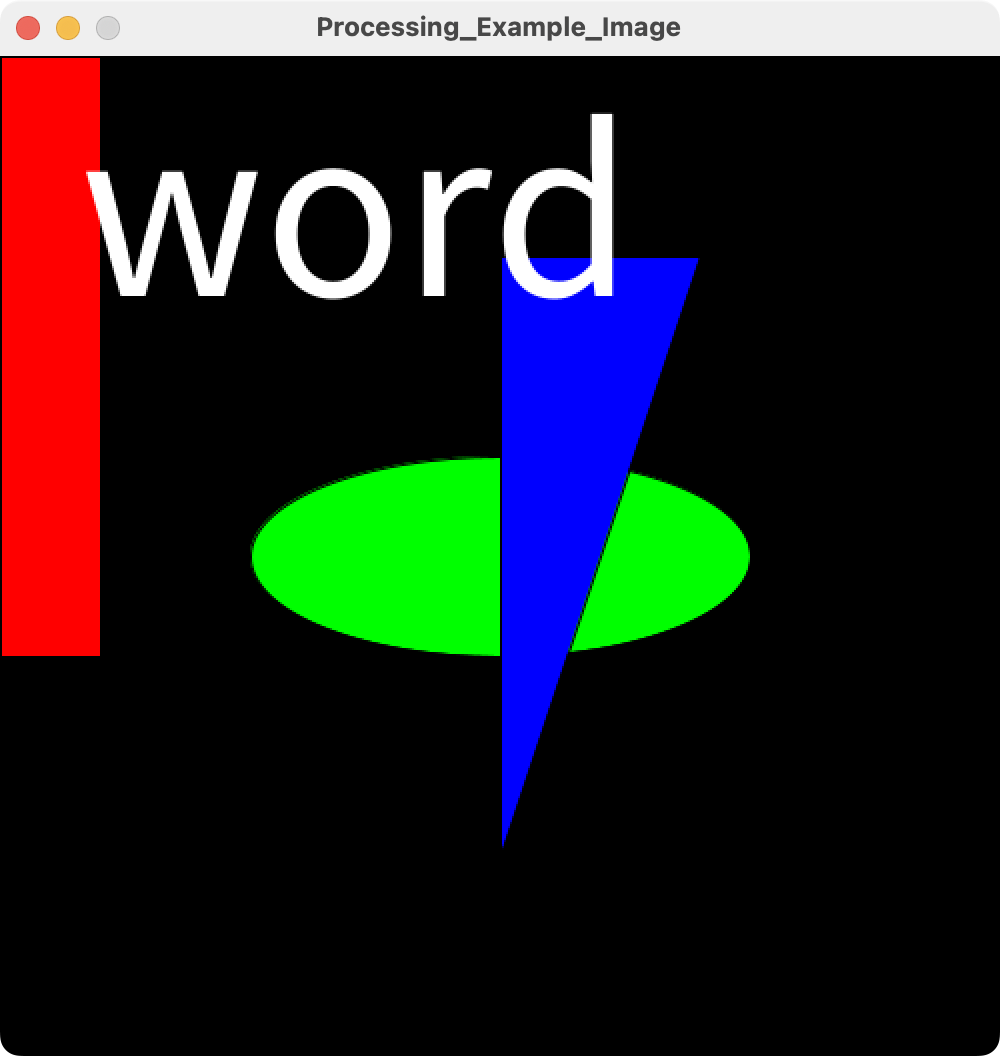
Play with the example code until you understand what everything does. Then, create your own image that uses at least 5 shapes and 1 phrase.
Always create/save processing projects with the following pattern LastName_Asg_Chap_AsgNum (Ex: Siva_Asg1_1), then under the Tools menu, select Archive Sketch. That should create the .zip file you need to submit to the corresponding assignment dropbox in D2L.
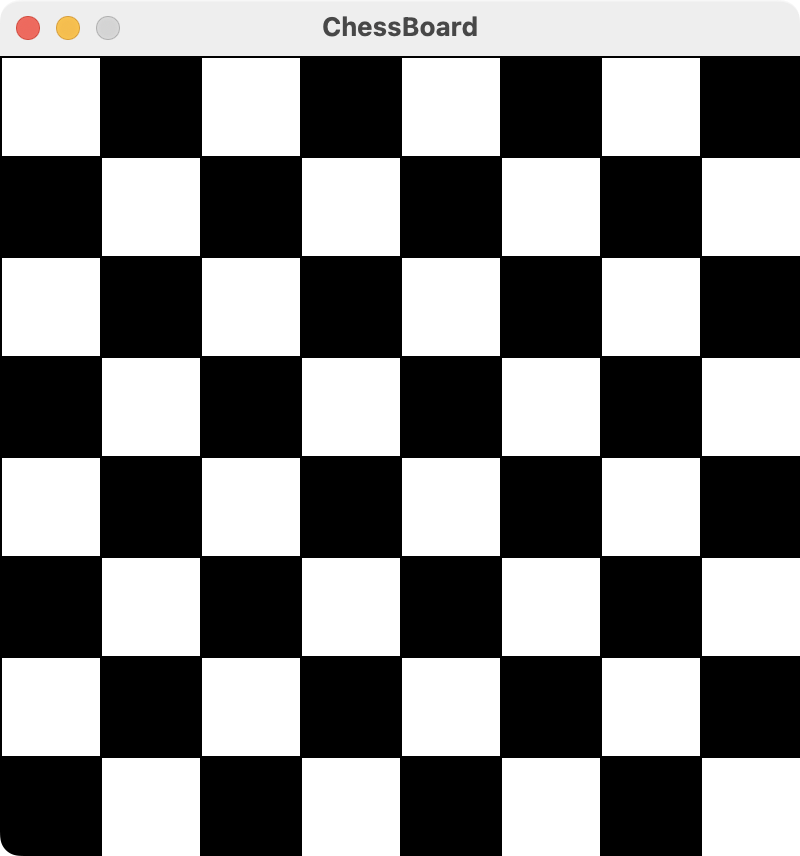
Processing Asg 1.2
Notes:
|
|
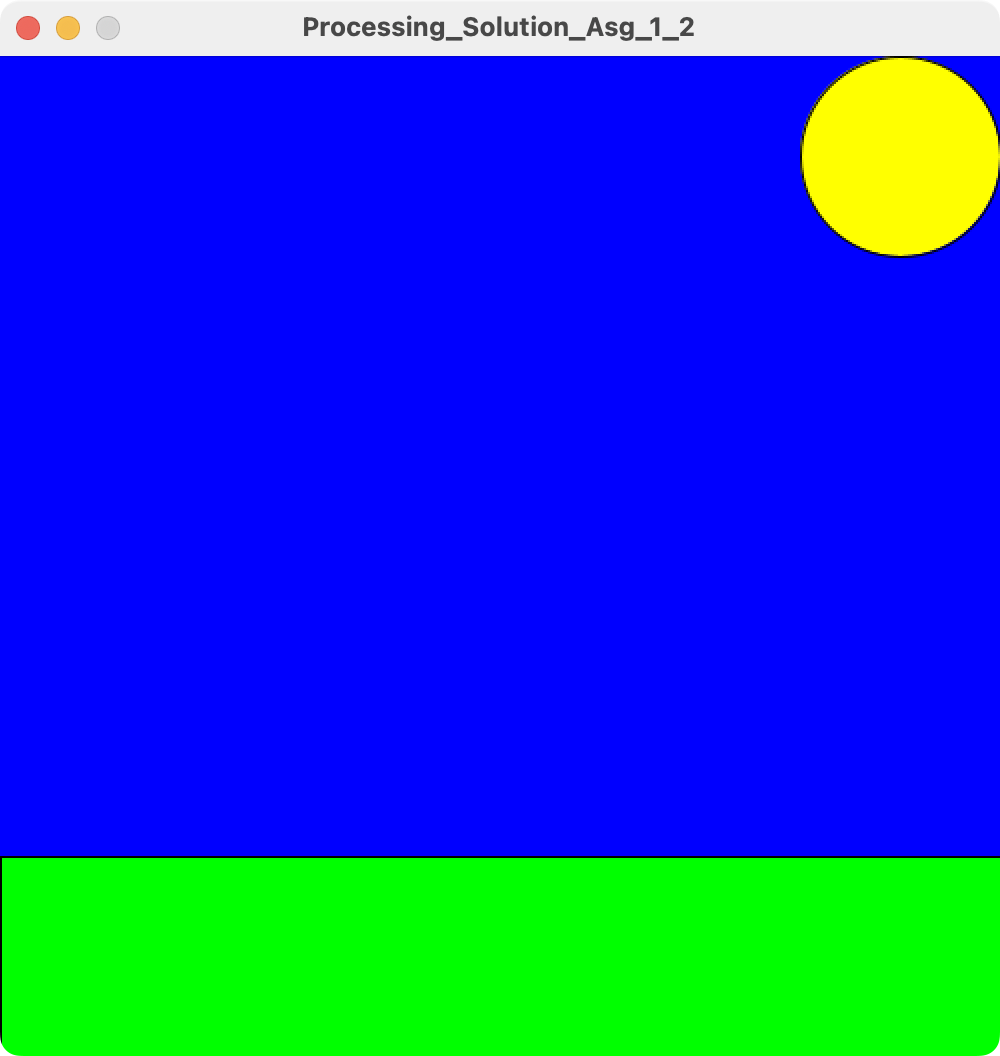
Duplicate the adjacent image perfectly and submit it in D2L.
1.4. Get an Integrated Development Environment
An Integrated Development Environment (IDE) is a software application that bundles essential tools for writing, testing, and debugging code into a single interface. We will use one throughout the semester for larger projects. There are many available, but there will be important concepts in common across all of them.
1.4.1. Syntax Highlighting
IDEs will highlight text according to the type of syntax it is. This will make identifying the structural components of the program easier, allowing programmers to quickly skim code for specific elements. Unfortunately, there is no standardized color scheme, so each IDE will use different colors for different components.

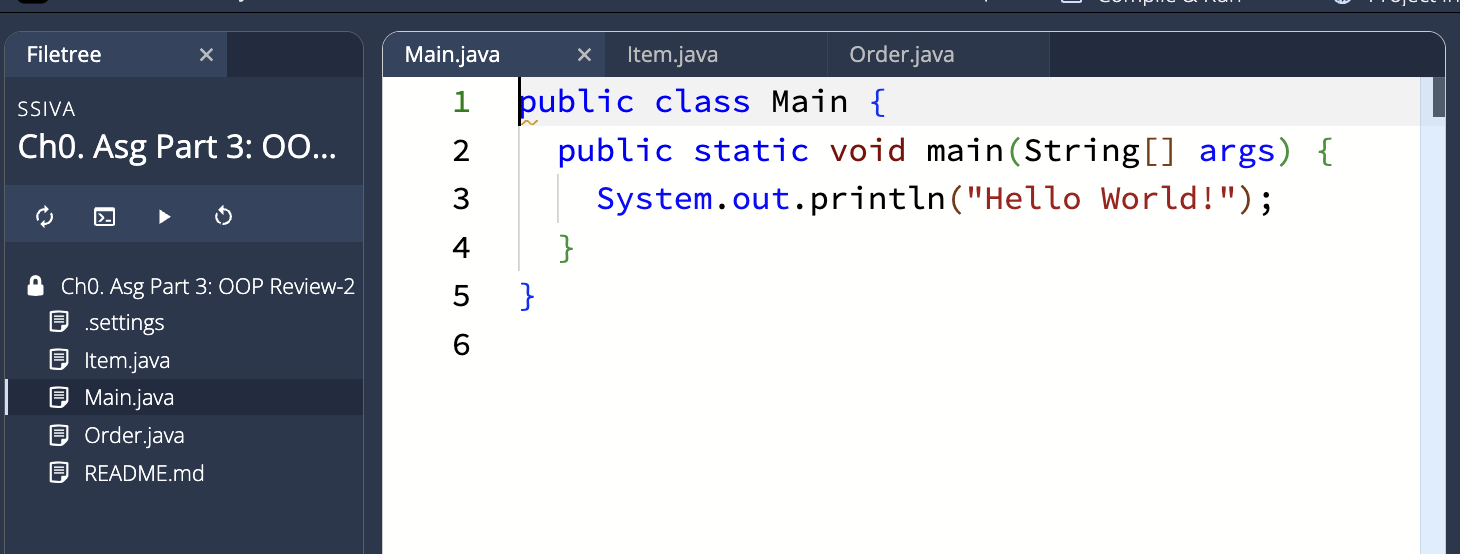
1.4.2. Multiple Files in Tabs
IDEs will be used for complex projects requiring multiple code files. Stay organized with logical file names and tabs.
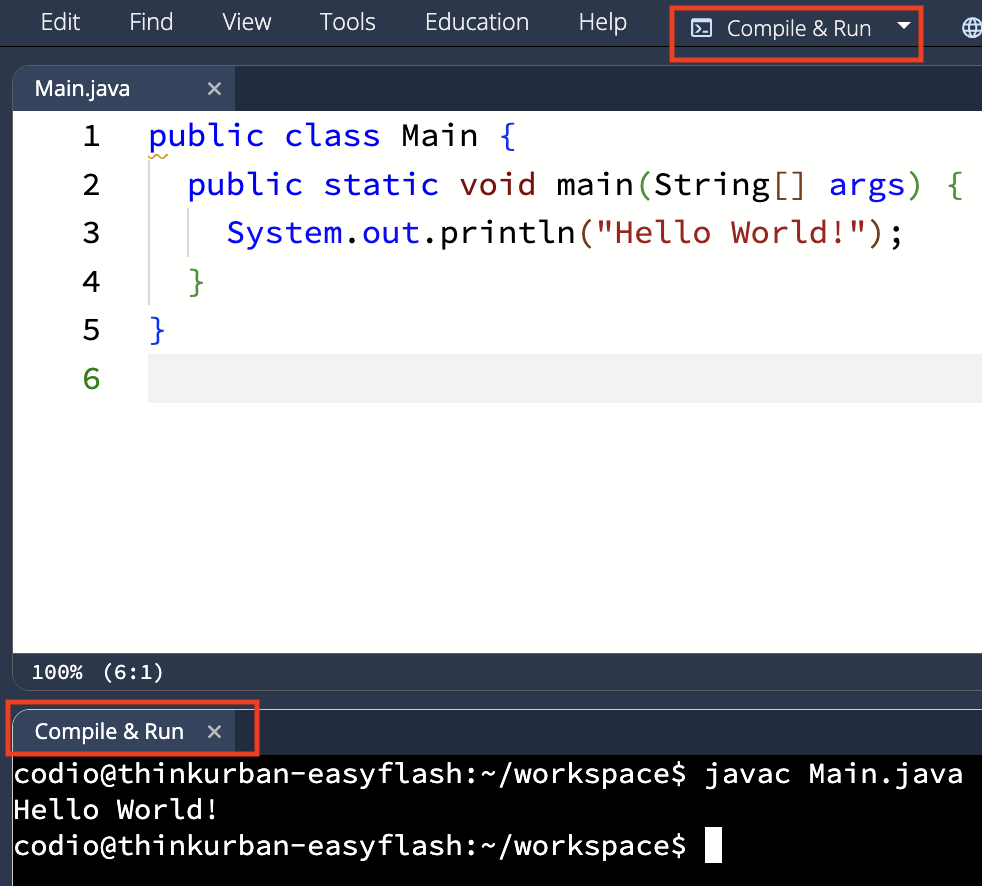
1.4.3. The Run Button and the Console
Assuming your IDE and project are properly configured, there should be a Run button which will execute your code. As a beginner, your code will most likely print text to a console window (also known as a terminal or shell).
2. Chapter 2: Data Types, Variables, and Expressions.
2.1. Data Types and Values
Programming is about processing data. Data is organized into different types. There are an endless number of data types in Java. In fact, many programmers spend most of their time coming up with new ones. Still, most Java coding is built on top of the basic data types below.
| Data Type | Example Values |
|---|---|
int |
2, -2, 0, 834529 |
double |
2.0, -2.235, 0.0, 8329.123782 |
boolean |
true, false |
char |
'a', '!', '9', '+' |
String |
"Hello World!", "30043", "12 - 5" |
|
Primitive versus Non-Primitive Data Types
int, double, boolean, and char are all primitive data types. There are several others which advanced programmers can choose to more efficiently use memory. Non-primitive types (also called Classes) are built out of combinations of primitive data. |
|
Characters, Strings, and Quotes
In order to distinguish them from other things, chars and strings are always surrounded by single and double quotes respectively. |
You should now be able to look at any line of Java code and identify all of its data values and their corresponding data type. Anything that is not a value, is something else that you will learn later.
2.2. Variables
Variables are (virtual) boxes that store values for reuse later. A variable has a name and a current value. Each variable can only hold one value at a time. Variables are created by specifying a data type and a name. They are assigned a value using the single equal sign (=). As Java executes one line at a time, variables come into existence on the line where they are first assigned.
CopyMe Asg 2.1
2.3. Operations and Expressions
Processing data is all about operations (like +). Each type of data has its own set of relevant operations. Operations usually act on 2 values and return a value (Ex: 2 + 3 returns 5). As such, they can be chained into larger expressions (Ex: 3 * (2 + 6)). Although there is an order to operation processing (* happens before +), it is always best to explicitly specify the intended order using parenthese. Java always processes the deepest parentheses first.
|
Syntax for Values and Expressions
In Java, anywhere you can write a value, you can legally write an expression that returns the same type of data. For example, if it is legal to write |
2.3.1. Numeric Operations
Both ints and double allow the same set of standard operations: +, -, *, /. If both sides of the operator are ints, the return value type is int. If at least one side is a double, the return value is a double.
|
Division
Dividing ints gives an int with any decimal places stripped off.(Ex: 5/2 returns 2). If there is at least one double, the return type is a double. (Ex: 5/2.0 returns 2.5) |
The remainder operator (%) is mainly used with ints and returns the remainder of the integer based division (Ex: 14 % 5 returns 4 because 14 divided by 5 is 2 with a remainder of 4).
2.3.2. Comparison Operators
The comparison operators return boolean values. They can compare 2 numbers (ints or double) and characters.
> |
Greater Than |
>= |
Greater Than or Equal |
< |
Less Than |
<= |
Less Than or Equal |
== |
Equals |
!= |
Not Equals |
|
Equality vs. Storage
Checking if two values are identical (==) is unrelated to storing a value in a variable (=).
|
2.3.3. Boolean Operations
Just like ints have numeric operators (+ - * /), booleans have their own operators (&& || !).
true && falseThe and operator takes 2 boolean inputs and returns true only when both sides are true, false otherwise.
false || trueThe or operator takes 2 boolean inputs and returns true when at least 1 side is true, false otherwise.
! trueThe not operator takes 1 boolean input and returns the opposite (negated) boolean.
|
Boolean Equality
We can also use == and != with booleans (Ex: true != false returns true). |
CopyMe Asg 2.2
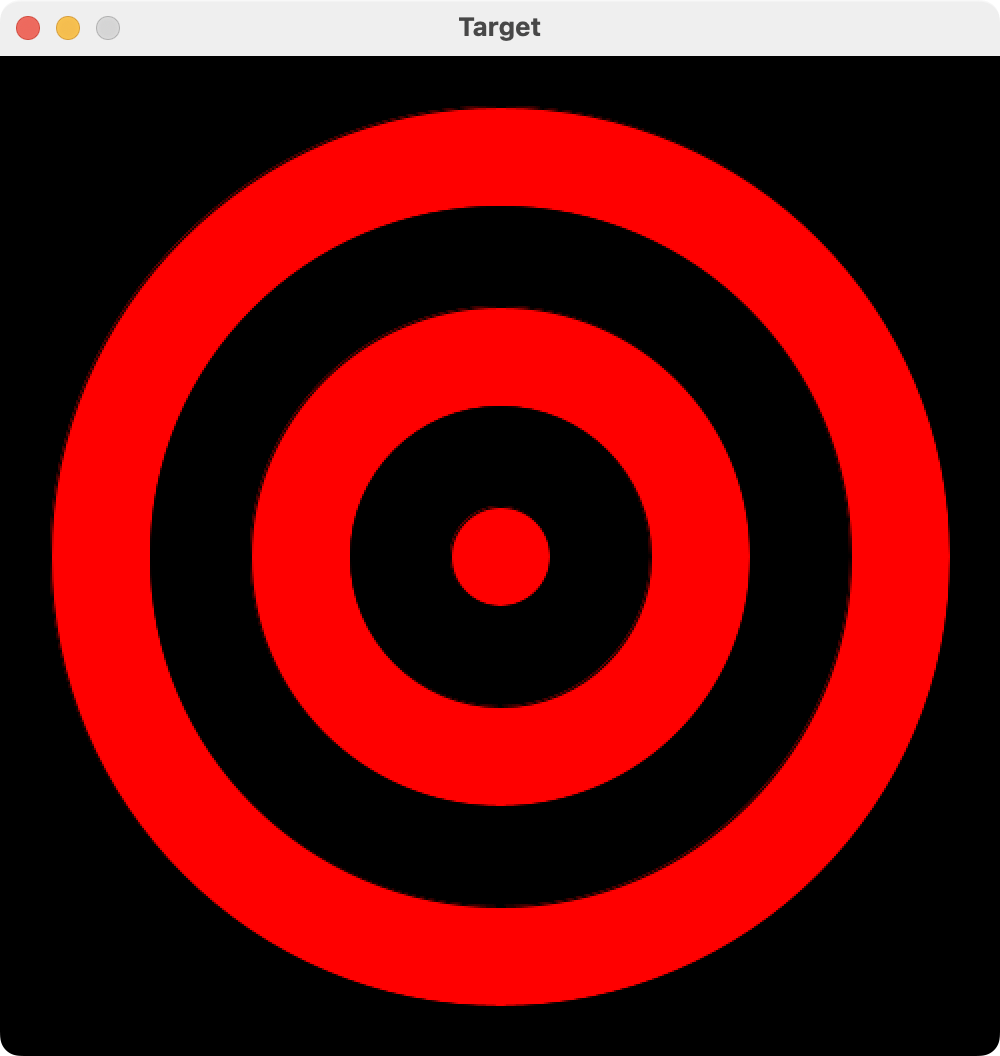
Processing Asg 2.1
1
2
3
4
5
6
7
8
9
10
11
12
13
14
15
16
17
18
19
20
21
size(500, 500);
background(0, 0, 0);
int canvas_size = 500;
int center = 0; // Expression for 50% the canvas_size
int red1 = 0; // Expression for 90% of the canvas_size
int black1 = 0; // Expression for 100 less than red1
int red2 = 0; // Expression for 100 less than black1
int black2 = 0; // Expression for 100 less than red2
int red3 = 0; // Expression for 100 less than black2
fill(255, 0, 0);
circle(center, center, red1);
fill(0, 0, 0);
circle(center, center, black1);
fill(255, 0, 0);
circle(center, center, red2);
fill(0, 0, 0);
circle(center, center, black2);
fill(255, 0, 0);
circle(center, center, red3);
Assignment Instructions
Replace the 0s with the code described by the comments. When done, your picture should match the target picture perfectly. Make sure to make Java do the math using the correct expressions. Don’t just do the math on yourself and type in the result. Hint: (9 / 10) returns 0 in Java. |
|
2.3.4. String Operations
Indexes
Strings in Java can vary in length from 0 characters to millions of characters (limited only by the computer’s memory). As such, we often need to break down strings into shorter fragments or individual characters in order to process them. String processing starts with the concept that each character in a string has a unique index which represents its position in the string. Indexes start with the first chracter at position 0, and end with the last character at position length - 1. The indexes for the string "Hi There" are below. Note that the string is of length 8, and thus has indexes from 0 to 7.
String Characters: |
H |
i |
T |
h |
e |
r |
e |
|
Indexes: |
0 |
1 |
2 |
3 |
4 |
5 |
6 |
7 |
DotMethods
Although we can use + with strings, for the most part, we use dot methods. We will discuss methods in more detail in the next chapter, but for now you need to know the following list of string dot methods:
-
.length() -
.charAt(int index) -
.substring(int begin_index, int end_index) -
.indexOf(String substring) -
.equals(String other)
CopyMe Asg 2.3
|
Plus Strings
When adding to strings all other data types are first converted to a string. |
|
String Equality
Never use == with strings. Use .equals() instead. |
|
String indexOf()
This method tries to find the starting index of a substring. If it fails it returns -1. |
2.4. Varying Variables
Variables can be modified using the = sign. Variables can only hold 1 value. The previous value is lost. Do not specify the data type when modifying a variable. Specifying a data type attempts to create a new variable.
CopyMe Asg 2.4
|
The += Operator
The |
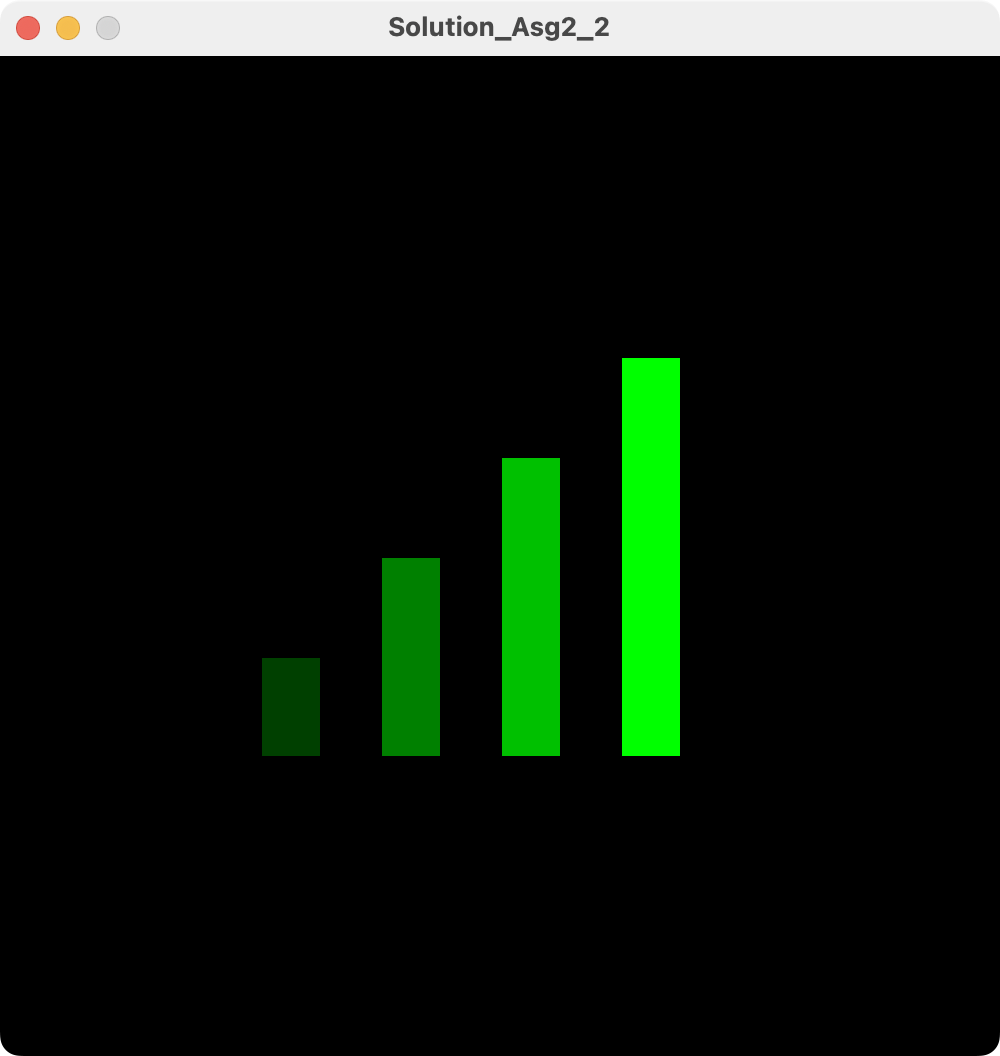
Processing Asg 2.2
1
2
3
4
5
6
7
8
9
10
11
12
13
14
15
16
17
18
19
20
21
22
23
24
25
26
27
size(500, 500);
background(0, 0, 0);
int r = 0;
int g = 64;
int b = 0;
int x = 130;
int y = 300;
int w = 30;
int h = 50;
fill(r, g, b);
rect(x, y, w, h);
//Section 1: Modify 4 variables
fill(r, g, b);
rect(x, y, w, h);
//Copy/paste the 4 formulas from Section 1
fill(r, g, b);
rect(x, y, w, h);
//Copy/paste the 4 formulas from Section 1
fill(r, g, b);
rect(x, y, w, h);
Assignment Instructions
Fill out Section 1 in the code with formulas to modify 4 variables. Copy/paste those formulas into the 2 sections below. The code should produce an image identical to the one on the right. Notes:
|
|
3. Chapter 3: Methods
3.1. Calling Methods
In chapter 1 we used methods from Processing like size(), fill(), and rect(). In Chapter 2, we introduced dot methods for strings like .length() and .substring(). Calling methods tells Java to perform tasks with specific parameter values.
For example, consider the call to the rect() method below.
rect(100, 200, 300, 50)Calling the rect() method requires that we specify the name of the method followed by parentheses containing 4 integer parameters representing the x, y, width, height of our rectangle. That tells Java to go execute the code necessary to draw a rectangle.
3.2. Defining New Methods
Before a method can be called, it must be defined. Most methods we have used this semester have been pre-defined for you by other programmers. Here, we introduce how to define your own custom methods. Once defined, you and other programmers will be able to use them like any other method. Thus, by defining your own methods, you are adding new functionality to Java. The fundamental approach to solving large programming problems is breaking them down into small method definitions, and then calling those methods to solve the original complex problem.
Consider the Processing example below:
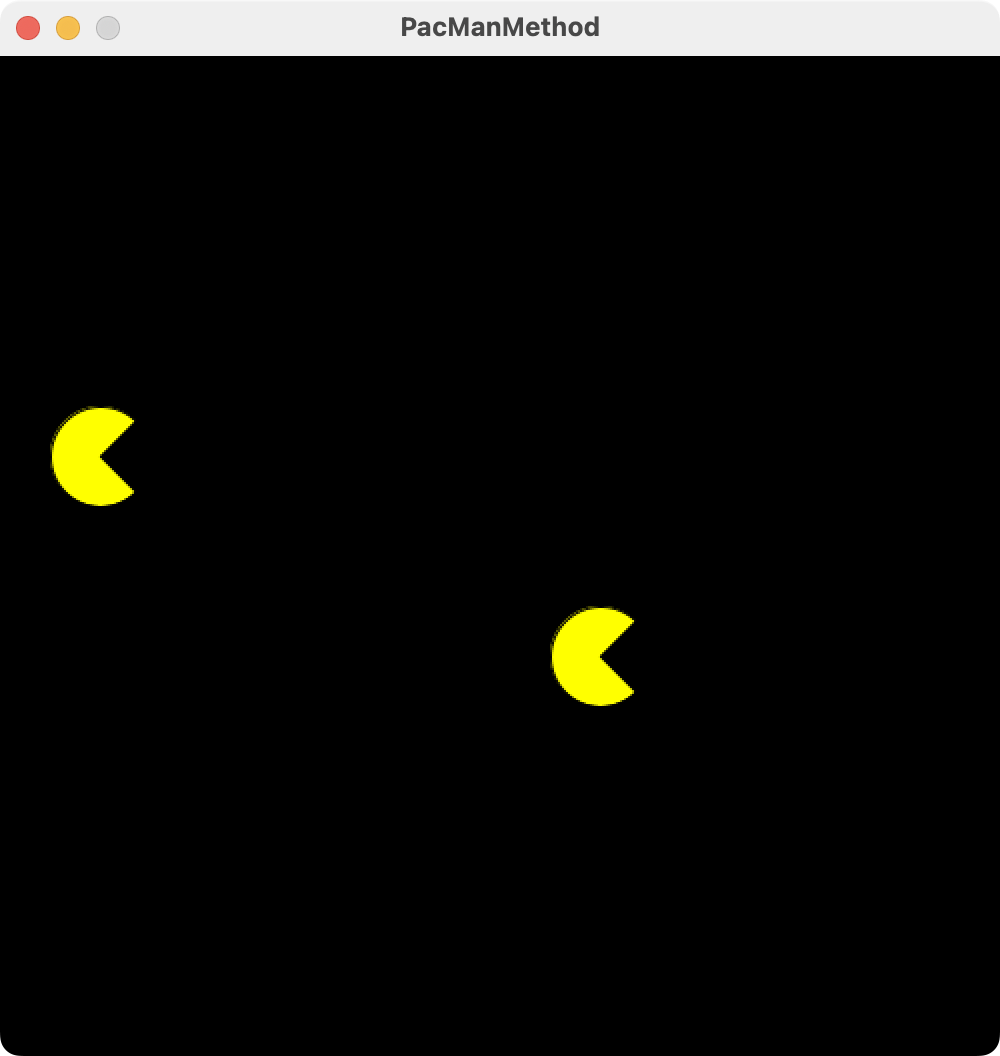
void pacman(int x, int y) { (1)
  fill(255, 255, 0);
  circle(x, y, 50);
  fill(0, 0, 0);
  triangle(x, y, x + 25, y - 25, x + 25, y + 25);
} (2)

pacman(50, 200); (3)
pacman(300, 300); (4)| 1 | The first line is called the method signature and has multiple parts:
|
| 2 | } - ends the block the method will execute when called. |
| 3 | Example of calling the pacman method and setting x, y to 50, 200 respectively. |
| 4 | Example of calling the pacman method and setting x, y to 300, 300 respectively. |
Processing Ex 3.1
Drawing 2 PacMans
|
|
Processing Asg 3.1
Drawing Ghosts
|
|
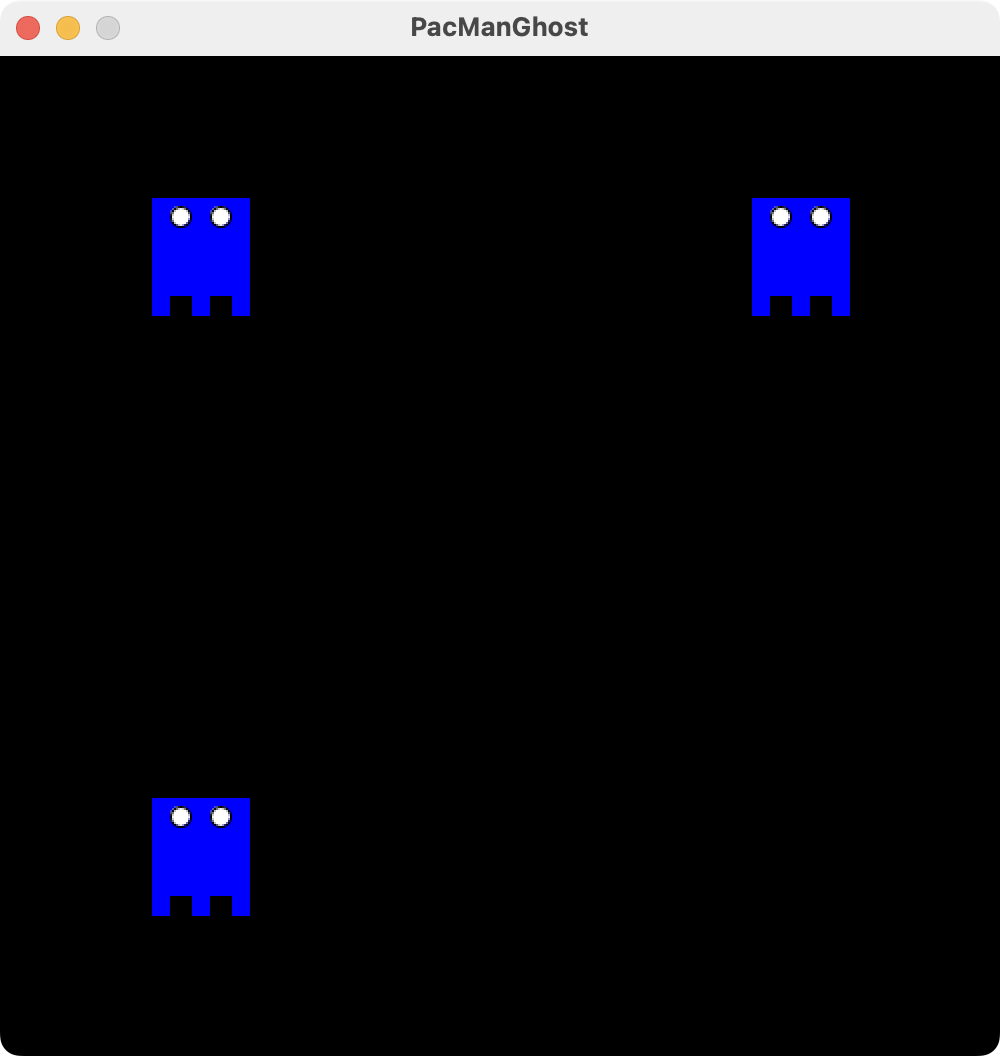
The code above draws one ghost in the center of the canvas (try it out). Modify the code so that it defines 2 methods, ghost() and setup(), similar to example 3.1 above. Then, from inside setup()`s block, call the ghost() method 3 times so a ghost appears in 3 locations: (100, 100), (400, 100), and (100, 400). When done, your image should match the one here.
3.3. public, static, class, and main
In this book we use some examples (like Processing) that are technically not 100% Java. These examples circumvent some of the complex syntax that a pure Java program requires. In other examples (like Java Visualizer) we stick with pure Java. In pure Java, programmers are required to organize and annotate their code with keywords that prevent other programmers from misusing code. These keywords are class, public, and static. For now, when you see one, just copy it and move on. Below are some very rough descriptions in the context of methods in case you are curious.
-
class: a collection of methods.
-
public: anyone can execute this method.
-
static: this method can only acces certain kinds of data.
-
main(): this is the start method for Java (similar to setup() in Processing). Java always automatically executes the main method when it starts.
We will learn the full meaning of these keywords later.
CopyMe Asg 3.1
3.4. Variables, Blocks, and Scope
When variables are created they are automatically assigned a block (chunk of code between {}) where they exist. Any attempt to use that variable outside of its block will fail. We call that block, the variable’s scope.
{ (1)
	int w = 10;
	{ (2)
		int x = w + 1;

	} (3)

	{ (4)
		int y = w + 2;
		int z = y * 3;

	} (5)
} (6)| 1 | The start of block 1, the outer most block. w belongs to this block and can be used anywhere inside of it. |
| 2 | The start of the a block 2, a block inside block 1. x belongs to this block and can be used anywhere inside of it. w can also be used here because we are still inside block 1. |
| 3 | The end of block 2. x is no longer visible after this. |
| 4 | The start of the a block 3, another block inside block 1. y and z belong to this block and can be used anywhere inside of it. w can also be used here because we are still inside block 1. |
| 5 | The end of block 3. y and z are no longer visible. |
| 6 | The end of block 1. w is no longer visible after this. |
|
Parameter Variables
A method’s parameter variables belong to the method’s block even though they are created just before the block’s {. |
3.5. Processing, setup(), and draw().
Earlier we introduced Processing’s setup() method, which is called automatically when Processing starts. Here we introduce the draw() method, which is called after setup() and repeated every 60 seconds enabling animations!
Processing Ex 3.2
Processing Asg 3.2
3.6. Return Values
Up until now, every method definition we have seen has used the void keyword to declare that the method did not return a value. Now we demonstrate using a data type instead of void to setup return values.
CopyMe Asg 3.2
|
Return Extis A Method
No code inside a method will be executed after a return statement. Return immediately exits a method. Even if a method has no return value (void), the return statement can be used to exit the method. |
4. Chapter Four: Conditions
4.1. Making Decisions
Computers make decisions that give the illusion of "thinking". For example, a digital thermostat turns on or off the heater depending on the current temperature in the room. IBM’s Big Blue computer decides what chess piece to move next when beating world chess champions. Google’s self-driving car decides when to apply the brakes depending on what is in front of it. All computer decisions are based on conditions built out of a simple logic called Boolean logic.
4.2. If Statements
Boolean logic allows a program to make a decision based on a condition. The if statement executes specific lines of code only when the condition is true. If the condition is false, the lines are skipped. The lines of code to be executed are grouped into a block using {}.
CopyMe Asg 4.1
Processing Ex 4.1
Processing Asg 4.1
4.3. If, Else
As we learned above, if statements will either execute or skip 1 block of code depending on the condition. In some situations, we want to choose between 2 blocks of code depending on the condition. This can be done with the if …else… statement.
CopyMe Asg 4.2
Processing Ex 4.2
Processing Asg 4.2
4.4. Else If
As we learned above, if else statements will execute 1 block out of 2 options, the if block or the else block. What if we want to force Java to choose 1 block out of 3 or more options? The answer is the _else if block.
CopyMe Asg 4.3
Processing Asg 4.3
4.5. While
As we learned above, the if statement allows us to execute a code block one time if a condition is true. The while statement, on the other hand, allows us to execute a code block repeatedly while a condition is true. This allows our code to loop potentially infinite times. To prevent infinite looping, the code block typically modifies the variable used in the condition. For example, the value of x is increased with every loop in the code snippet below.
int x = 1;
while (x < 5) {
	x += 1;
}
CopyMe Asg 4.4
|
Break!
Although it is not used in the example above, the break statement immediately exits a loop (as opposed to allowing it to run until the while condition is false). |
Processing Asg 4.4
Assignment Instructions
Duplicate the image by completing the code. Follow the instructions in the comment precisely.
|
|
5. Chapter Five: Arrays
Arrays are collections of values combined into a single entity. They enable a single variable to store multiple values, like a cubbyhole holding different items in each space.
5.1. Indexes
The indexes of each value in an array are identical to the indexes for each character in a string. They start with the first value at position 0 and end with the last value at position length - 1. The indexes for the array ["Apple", "Plum", "Kiwi"] are below. Note that the array is of length 3 and thus has indexes from 0 to 2.
Array Values: |
"Apple" |
"Plum" |
"Kiwi" |
Indexes: |
0 |
1 |
2 |
CopyMe Asg 5.1
|
Default Values
Arrays of primitive types like int and double have the default value of zero. Arrays of non-primitive types like String have the default value of null which means no value. This is different than the empty string "". |
|
Array Length
Each array has its own length property accessible via the .length variable. |
5.2. Loops
In many situations, we want to access every value of an array one at a time. This is accomplished by using each index from 0..length - 1 in a loop.
CopyMe Asg 5.2
Processing Asg 5.1
Assignment Instructions
Duplicate the image by completing the code. Follow the instructions in the comment precisely.
|
|
5.3. Counting
Computers are extremely fast at looping through arrays and searching for values that match criteria. They can process billions of values per second!
CopyMe Asg 5.3
5.4. For Loops and Break
While loops that follow the standard template below can be reduced to for loops.
int i = 0; (1)
while (i < 5) { (2)
	// do stuff repeatedly (3)
	i += 1; (4)
}| 1 | Init a variable for tracking the loop |
| 2 | Test if the loop should continue |
| 3 | The stuff that needs to be repeated |
| 4 | Modify the variable tracking the loop |
for(int i = 0; i < 5; i++) {  (1) (2) (4)
	// do stuff repeatedly (3)
}| 1 | Init a variable for tracking the loop |
| 2 | Test if the loop should continue |
| 3 | The stuff that needs to be repeated |
| 4 | Modify the variable tracking the loop |
|
Increment Operator ++
When you want to add 1 you can use |
CopyMe Asg 5.4
|
break
The break statement immediately exits a loop. |
6. Chapter Six: The Console and …
In this chapter we fill in some gaps we skipped in previous chapters that allow us to condense code and interact with a console (a.k.a. termina/shell/command line).
6.1. Type Conversion
So far we have introduced int, doubles, boolean, characters, and Strings. Here we demonstrate how to convert from one to the other with casting for primitives and other methods for Strings.
int a = ((int) 3.5); (1)| 1 | The cast operation uses parentheses to treat a value as a different type. |
CopyMe Asg 6.1
6.2. The Console
A console, also known as a shell or terminal, is a user interface which allows programs to interact with humans through text. Unlike graphical user interfaces, a console does not allow for images, sound, video, or even mouse input.
There are 2 methods you need for console programming, 1 for displaying text, and the other for asking questions and reading the user’s typed response.
-
void IO.println(String toDisplay) -
String IO.readln(String questionPrompt)
The following example creates a short interactive experience for the user. Try it out in your IDE and see what happens.
|
println() vs. text()
Processing apps use the text() method to display text to the user. It requires coordinates that specify where on the screen the text is displayed. The IO.println() method does not require coordinates as the console is a text based system that always puts 1 character after another. |
6.3. Procedural Programming
At this point, we have learned how to solve small problems (roughly less than 10 lines of code). How do we solve large problems? There are a variety of strategies to divide and conquer large problems in programming including Object Oriented, Procedural, and Functional programming. Although Java is designed for Object Oriented programming, we choose to first explore procedural programming as it was historically the earliest and easiest approach. A procedure is another word for function or method, and in Java, is typically created with the public static keywords. We have been defining these since chapter 3. The goal is to divide the large problem into smaller methods, implement those methods, and then call them in a combination that solves the original problem.
The following exercise (to be completed by you) demonstrates the procedural approach to programming.
public class Main {

    /**
     * @param a     an array of strings
     * @return      a random string from the array
     * Ex: getRandomString(new String[]{"am", "be", "ok"}) -> "be"
     */
    public static String getRandomString(String[] a) {
        return "";
    }

    /**
     * @param s         a string
     * @param percent   a percentage between 0.0 and 1.0
     * @return          percentage of a string
     * Ex: getPercentString("hello", 0.4) -> "he"
     */
    public static String getPercentString(String s, double percent){
        return "";
    }

    /**
     * @param s     a string
     * @return      the number of underscores ('_') in the string
     * Ex: countUnderScores("s_m__e") -> 3
     */
    public static int countUnderScores(String s) {
        return 0;
    }

    /**
     * @param answer            string with correct answer and no blanks
     * @param guessedLetters    string with letters guessed so far
     * @return                  string with underscores for letters not yet guessed
     * Ex: getAnsWithBlanks("sample", "mes") -> "s_m__e"
     */
    public static String getAnsWithBlanks(String answer, String guessedLetters){
        return "";
    }

    /**
     * Prompts the user (via console input) to guess a letter.
     * Repeats the question as long as the user's reply is not length 1.
     * @return the string of length 1 containing the user's guess
     * Example assuming user enters 'Bob', then 'e':
     * getUserGuess() -> "e"
     */
    public static String getUserGuess(){
        return "";
    }

    /**
     * Plays the entire game assuming the methods above are correctly implemented.
     */
    public static void playKirbyFriends() {
        String[] all_friends = new String[] {"mario", "zelda", "kong", "fox", "mac"};
        String secret = getRandomString(all_friends);
        String kirby = "<(˶ᵔᵕᵔ˶)>";
        String guessedLetters = "";
        String answerBlanks = getAnsWithBlanks(secret, guessedLetters);
        double correctPercent = 0.0;

        for(int numTurns = 1; numTurns <= 10; numTurns++) {
            IO.println("ANSWER:\t" + answerBlanks);
            if(correctPercent >= 1.0) {
                break;
            }
            IO.println("TURN:\t" + numTurns + " out of 10");
            String g = getUserGuess();
            IO.println();

            guessedLetters += g;
            answerBlanks = getAnsWithBlanks(secret, guessedLetters);
            correctPercent = (secret.length() - countUnderScores(answerBlanks)) /
                    ((double) secret.length());
            IO.println("TRIES:\t" + guessedLetters);
            IO.println("KIRBY:\t" + getPercentString(kirby, correctPercent));
        }

        IO.println();
        if(correctPercent < 1.0) {
            IO.println("GAME OVER");
        } else {
            IO.println(kirby + " Hiii " + secret + "!");
            IO.println("YOU WIN!");
        }
    }

    public static void main(String[] args) {
        playKirbyFriends();
    }
}|
MultiLine Comments
When you want to comment multiple lines in a row, start with a /* and end with a */. |
|
Javadoc
The @param and @return commenting syntax is the standard way by which we describe a method’s parameters and return value. |
Notice how the final method, playKirbyFriends(), is mostly variable creation and prints to the user. In fact, without those, the logic is short and sweet.
public static void playKirbyFriends() {
	String secret = getRandomString(all_friends); (1)
	String answerBlanks = getAnsWithBlanks(secret, guessedLetters); (4)

	for(int numTurns = 1; numTurns <= 10; numTurns++) {
		if(correctPercent >= 1.0) {
			break;
		}
		String g = getUserGuess(); (5)

		guessedLetters += g;
		answerBlanks = getAnsWithBlanks(secret, guessedLetters); (4)
		correctPercent = (secret.length() - countUnderScores(answerBlanks)) /
				((double) secret.length()); (3)
		IO.println("KIRBY:\t" + getPercentString(kirby, correctPercent)); (2)
	}
}| 1 | Call to getRandomString() |
| 2 | Call to getPercentString() |
| 3 | Call to countUnderScores() |
| 4 | Call to getAnsWithBlanks() |
| 5 | Call to getUserGuess() |
Thus a complex problem, when broken down into simpler pieces, can have a straightforward solution. This is also known as problem decomposition. In the next chapter, we dive into Object Oriented Programming, the problem decomposition technique Java was designed for!
7. Chapter Seven: Object Oriented Programming
Object Oriented Programming (OOP) stems from the idea that we can create new complex data types, complete with their own operations, from existing data types. This turns out to be a superior strategy for large problems than procedural programming, and as such is now industry standard.
7.1. Data Types Review
Let us review the main data types and corresponding operations we have learned so far.
| Data Type | Example Value | Operations |
|---|---|---|
int |
2 |
+ - * / % < > != == ... |
double |
2.0 |
+ - * / < > ... |
boolean |
true |
&& || ! |
char |
's' |
== != |
String |
"Dog" |
+ .length() .charAt() .substring() .indexOf() .equals() |
You will immediately notice several irregularities with the String data type:
-
String has a capitalized S.
-
A string is a combination of a simpler data types (chars).
-
String operations (besides +) are dot methods. They have a name with parentheses and parameters.
This is all due to the fact that Strings are not primitive data types.
7.2. Classes and Objects
Primitive data types, like int or boolean, are never capitalized and can only be manipulated with operators, like + or &&. Non-primitive types, like String, are called classes. They should always be capitalized and can use dot methods like .substring(). Furthermore, they can be much more sophisticated, containing complex combinations of other data types.
To defina a new data type in Jave, we use the keyword class (like class of car). Once this new data type is created, we can create values of that type. We call those values objects or instances.
| Primitive Type | Example Value |
|---|---|
int |
2 |
boolean |
true |
Class (non-primitive type) |
Example Object (value) |
String |
"Dog" |
Date |
3/14/2023 |
|
Terminology
Instead of saying "Dog is a value of type String.", The meaning is identical, but we keep it classy! |
7.3. Defining a New Class
Every data type has 4 essential pieces:
-
The Name
-
The Data - Fields or Instance Variables
-
How to Initialize it - Constructor
-
The Operations / Functionality - Instance Methods
class Date { (1)
    int month; (2)
    int day; (2)
    int year; (2)

    Date(String s) { (3)
        this.month = Integer.parseInt(s.substring(0, 2));
        this.day = Integer.parseInt(s.substring(3, 5));
        this.year = Integer.parseInt(s.substring(6, 10));
    }

    boolean laterThan(Date other) { (4)
        if (this.year > other.year){
            return true;
        }
		// COMPLETE THIS AS AN EXERCISE
		return false;
    }
}| 1 | The class name. |
| 2 | The fields that the class is composed of. |
| 3 | The constructor (always same name as the class) initializes fields. |
| 4 | An instance method (there are usually several of these). |
|
This
The this keyword references the current object. Thus, if we are working with 3/14/2023, this.month refers to 3. If we are working with 5/4/2023, this.month refers to 5. |
7.4. Using a Class
There is no point in creating a new data type if we don’t then create values of that type. Values of a class are called objects and are instantiated with the new keyword.
public class Main {
    public static void main(String[] args) {
        Date a = new Date("03/14/2023"); (1)
        Date b = new Date("05/04/2023"); (2)
        boolean c = b.laterThan(a); (3)
    }
}| 1 | An object of class Date. |
| 2 | Another object of class Date. |
| 3 | Calling an instance method on object b. |
|
main method
The main method could theoretically be in any class including Date. In fact, each class can have it’s own main method just for testing purposes. |
7.5. Instance Methods
Instance methods can of course call other instance methods on the same instance / object. Use the this keyword to explicitly call instance methods using the same object. For example, since 2 dates must be either earlier, later, or equal to each other, we could implement the logic for earlier than by checking that it is not later than nor equal to another date.
class Date {

	//COMPLETE AS AN EXERCISE

	boolean earlierThan(Date other) {
		return (!this.equals(other)) && (!this.laterThan(other)); (1)
	}
}| 1 | Note how we use this to call other methods on the same object. Of course, we need to correctly implemented .laterThan() and .equals() methods first. |
7.6. Classes in Processing
Of course, classes are a very useful way to organize processing code. Take a look at the exercise below.
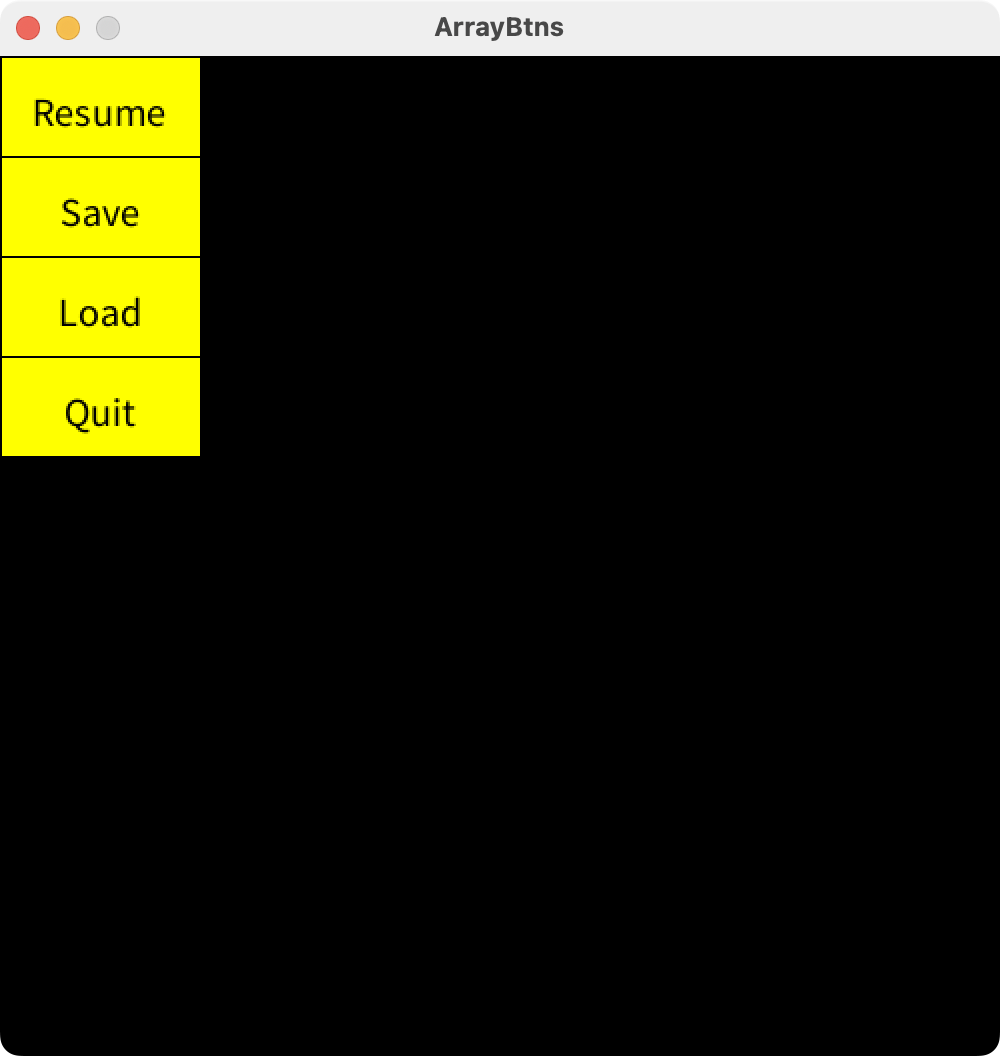
Processing Asg 7.1
Assignment Instructions
Duplicate the functionality in the video by defining a Button class. Notes From Video:
|
1
2
3
4
5
6
7
8
9
10
11
12
13
14
15
16
17
18
19
20
21
22
23
24
25
26
Button a; (1)
Button b; (1)
int score;
void setup() {
size(500, 500);
a = new Button(10, 10, 200, 50, "1 Point per Click"); (2)
b = new Button(10, 70, 200, 50, "60 Points per Second!"); (2)
score = 0;
}
void draw() {
background(0, 0, 0);
a.update(); (3)
b.update(); (3)
if(a.submitted()) { (4)
score++;
}
if(b.heldDown()) { (5)
score++;
}
fill(255, 255, 255);
textSize(50);
textAlign(CENTER, CENTER);
text("Score: " + score, 255, 255);
}
| 1 | Create a class called Button so these variables work. |
| 2 | The constructor takes 4 ints (like Rect()) and a string for the label. |
| 3 | Button has an instance method called update() which the tester calls every frame. |
| 4 | Button has an instance method called submitted() which returns true the frame in which the button was pressed. |
| 5 | Button has an instance method called heldDown() which returns true every frame the button is currently down. |
Part 1
Create the new Button class with fields, constructor, and update() instance method. In Processing, this is done by creating a new editor tab next to the main (default) tab. The Button class needs 7 fields:
The constructor initializes all fields:
The update() method:
|
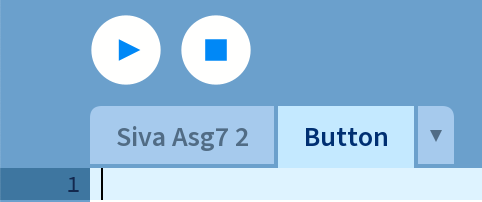
Button Tab
Button Class
Simple Button Test
|
||||
Part 2
Make the Button highlight when the mouse is over it. Change the update() method:
|
Simple Button Test
|
||||
Part 3
Keep track of when the button is held down. Change the update() method:
|
Complete Button Test
|
7.7. The toString() Method
Anytime Java wants to convert any object into a String, it calls the toString() instance method. If your class does not have one, it uses a default version which tells us very little. Take a look at the example below:
1
2
3
4
5
6
7
8
9
10
11
12
13
class Point {
double x;
double y;
Point(double x, double y) {
this.x = x;
this.y = y;
}
public String toString() { (1)
return "Point: (" + this.x + ", " + this.y + ")"; (2)
}
}
| 1 | The toString() method must always have this exact signature (including public). |
| 2 | Build and return a String that describes the object. |
1
2
3
4
5
6
7
8
9
public class Main {
public static void main(String[] args) {
Point a = new Point(3.5, 7);
Point b = new Point(-1, 3.14);
IO.println(a.toString()); (1)
String s = "Boat at " + b.toString(); (2)
IO.println(s);
}
}
| 1 | The println() method needs a String so we use .toString() to convert the Object into a String. |
| 2 | The + operator needs a String so we use .toString(). |
Point: (3.5, 7.0)
Boat at Point: (-1.0, 3.14)
Console Asg 7.1
7.8. Object Composition
The fields of a class can be other classes. As an example, the Date class from section 7.3 was made out of 3 int values representing month, day, and year, but we might create a Student class out of 2 objects, String and Date, representing name and birthday. The technique of using objects to build more complex objects is called object composition.
Many of the processing assignments in the remaining chapters work together to build a cannon game. The video below shows the final result in the final chapter.
Processing Asg 7.2
Note: This assignment depends on the Point class code created previously. Copy it into a separate processing tab.
Instructions Part 1
Create a Target class so that the test code makes the picture shown. The Target class should have:
|
Target Test 1
|
||
Instructions Part 2
Make the Target destroyable.
|
Target Test 2
|

Processing Asg 7.3
Note: This assignment depends on the Point class code created previously. Copy it into a separate processing tab.
Instructions Part 1
Create a Ball class so that the test code makes the picture shown. The Ball class should have:
|
Ball Test 1
|
||
Instructions Part 2
Modify the Ball class to give the ball velocity so that the test code makes the animation shown. New field called vel:
|
Ball Test 2
|
||
Instructions Part 3
Modify the Ball class to give the ball gravity so that the test code makes the animation shown. New field called grav:
|
Ball Test 3
|

Processing Asg 7.4
8. Chapter Eight: Reusable Classes
A general strategy when designing classes is to make them as reusable as possible. Ideally, classes are not just reused by you in your current project, but by other programmers across many projects across many years. To accomplish this we need classes to be flexible, but also robust. Programmers who know very little about the inner workings of a class should not be able to accidentally break its logic. To create flexibility and safeguards we will need several new keywords including public, private, and static.
8.1. Naming Conventions
As we get into more traditional layouts for class files, it is important that we take a moment to summarize the naming conventions most Java programmers stick to. As names cannot contain spaces, we use a technique called CamelCase to combing separate words into a name capitalizing the first letter of extra words in the name.
-
Class Names:
-
Example: LaserTurret
-
Typically a noun
-
Starts with an uppercase letter followed by CamelCase.
-
-
Variable Names:
-
Example: zipCode
-
Typically a noun
-
Starts with a lowercase letter followed by CamelCase.
-
-
Method Names:
-
Example: confirmPurchase
-
Typically a verb
-
Starts with a lowercase letter followed by CamelCase.
-
8.2. Protecting Fields
Fields, also know as instance variables, are the members of a class that make up its data. We can control whether or not other classes use them directly by declaring them as public or private.
In the example below we use the public access modifier to allow the Main class to access the Point class’s fields:
Point class with public fields
|
Point class tester
Console Output
3.5 Point: (-1.0, 50.0) |
In the example below we use the private access modifier to prohibit the Main class from accessing the Point class’s fields:
Point class with private fields
|
Point class tester
|
Protecting fields with the private access modifier is standard practice as it prevents other programmers (writing other classes) from accidentally modifying fields to unacceptable values. For example, we would not want someone setting the month/day/year fields of the Date class to 50/50/2020 as this is not a valid calendar date.
8.3. Protecting Methods
Instance methods provide the operations of a class. We can control whether or not other classes use them directly by declaring them as public or private.
In the example below we use the public access modifier to allow the Main class to access the Point class’s methods (and constructor):
Point class with public methods
|
Point class tester
Console Output
Point: (2.5, 10.14) |
In the example below we use the private access modifier to prohibit the Main class from accessing the Point class’s methods:
Point class with private methods
|
Point class tester
|
Making instance methods accessible with the public access modifier is standard practice. It is rare that we would want to prevent other classes from calling an instance method.
8.4. Getters and Setters
We can control read versus write acces to fields by making the fields private and creating instance methods to get (read) or set (modify) the fields as needed.
The example below creates a version of the Point class that only has getter methods for the fields, but no setter methods. As a result, this class is called immutable. An object of this class can never be modified.
Point class with only getters
|
Point class tester
Console Output
3.5 3.14 |
The example below creates an example Employee class that has a combination of getter and setter methods for the fields. As a result, the employeeID field can never be modified, but the name and salary fields can be.
1
2
3
4
5
6
7
8
9
10
11
12
13
14
15
16
17
18
19
20
21
22
23
24
25
26
27
28
29
30
31
class Employee {
private int employeeID;
private String name;
private double salary;
public Employee(int id, String n, double s){
this.employeeID = id;
this.name = n;
this.salary = s;
}
public int getEmployeeID() { (1)
return this.employeeID;
}
public String getName() { (1)
return this.name;
}
public void setName(String name) { (2)
this.name = name;
}
public double getSalary() { (1)
return this.salary;
}
public void setSalary(double salary) { (2)
this.salary = salary;
}
}
| 1 | Declaring Getter Method |
| 2 | Declaring Setter Method |
1
2
3
4
5
6
7
8
9
public class Main {
public static void main(String[] args){
Employee a = new Employee(900084112, "Lisa", 75000.00);
Employee b = new Employee(900084111, "Sam", 50000.00);
IO.println(a.getEmployeeID() + ":" + a.getName() + " $" + a.getSalary()); (1)
b.setSalary(b.getSalary() * 1.2); (2)
IO.println(b.getEmployeeID() + ":" + b.getName() + " $" + b.getSalary()); (1)
}
}
| 1 | Calling Getters |
| 2 | Calling Setter |
Processing Asg 8.1
Instructions Part 1
Create a Ghost class to create a PacMan Ghost. The Ghost class should have:
|
Ghost Tester 1
|
||
Instructions Part 2
Create getters and setters for the Ghost’s fields. Make sure the setters prevent the ghost from going totally off screen. |
Ghost Tester 2
|
||
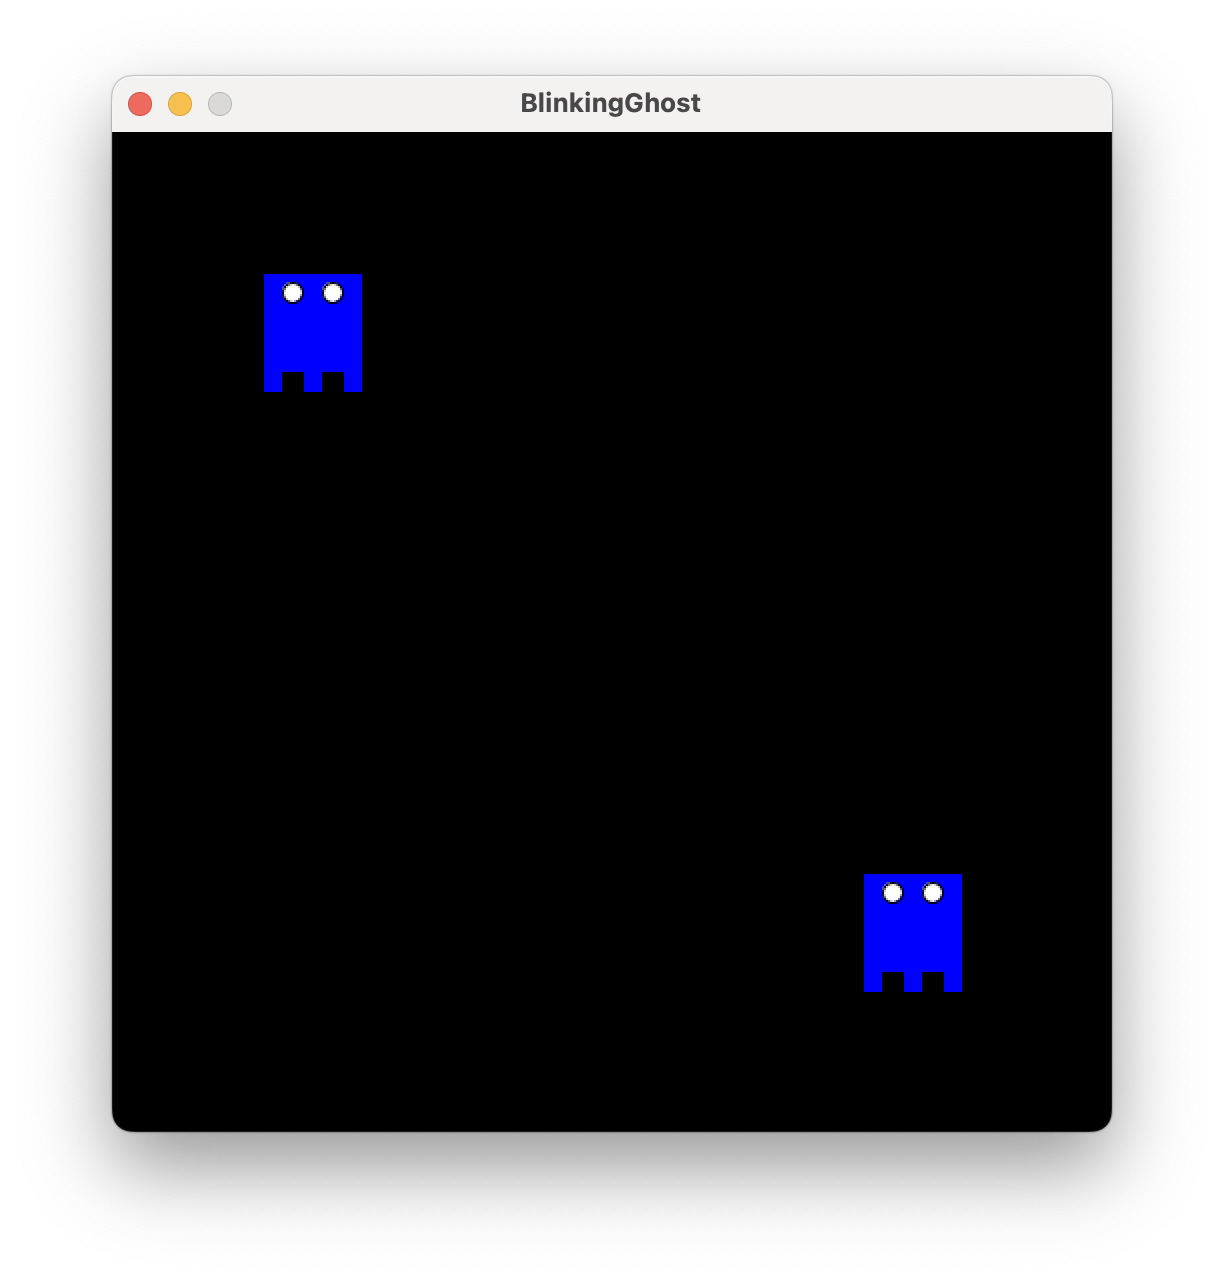
Optional Challenge
Make the ghosts blink. Hint: You need an extra field in the Ghost class to control how much blue to draw the ghost with. In the video, the ghosts lose 5 blue per frame until they have none, then reset back to full blue. |
Processing Asg 8.2
Processing Asg 8.3
8.5. Static Fields
We have covered regular fields, also known as instance variables since the beginning of chapter 7. These fields hold values specific to an object (a.k.a instance or value) of a class. For example, every instance of Date had its own month, day, and year. There are some situations where fields have the same value across all instances. For example, consider a Student class. Each student might have their own gpa field, but every student would share the same maxGpa value (4.0) representing the highest possible grade point average. Such a field would be marked as static and would be called a class variable instead of an instance variable because all instances (objects) would share the same value.
1
2
3
4
5
6
7
8
9
10
11
12
13
14
15
16
17
18
19
20
21
22
23
24
25
26
27
28
29
30
31
32
33
34
35
36
37
38
39
40
41
42
public class Student {
private int studID;
private String name;
private double gpa;
public static double maxGpa = 4.0; (1)
public Student(int ID, String n, double g) {
this.studID = ID;
this.name = n;
this.gpa = g;
}
public int getStudID() {
return this.studID;
}
public String getName() {
return this.name;
}
public void setName(String name) {
this.name = name;
}
public double getGpa() {
return this.gpa;
}
public void setGpa(double gpa) {
if(gpa < 0) {
gpa = 0;
}
if(gpa > Student.maxGpa) { (2)
gpa = Student.maxGpa; (2)
}
this.gpa = gpa;
}
public double getPercentGrade() {
return this.gpa / Student.maxGpa; (2)
}
}
| 1 | Declaring a class variable with static. The value is initialized here because a construtor does not need to be called before it is used. |
| 2 | Using a static variable requires the class name because it is not specific to this object. |
1
2
3
4
5
6
7
8
public class Main {
public static void main(String[] args) {
IO.println("MAX GPA: " + Student.maxGpa); (1)
Student a = new Student(900012345, "Bob", 3.0);
IO.println(a.getName() + " has GPA: " + a.getGpa() +
" which is " + (100 * a.getPercentGrade()) + "% of max.");
}
}
| 1 | Note we reference the class variable directly from the class name. |
MAX GPA: 4.0
Bob has GPA: 3.0 which is 75.0% of max.
8.6. Static Methods
Most of the methods we write in a class reference fields (instance variables), but every once in a while we might write a method that does not reference any instance variables. These methods should be declared as static making them class methods. Class methods, like class variables, do not need an object to be constructed before they are called.
1
2
3
4
5
6
7
8
9
10
11
12
13
14
15
16
17
18
19
20
21
22
23
24
25
26
27
28
29
30
31
32
33
34
35
36
37
38
39
40
41
public class Student {
private int studID;
private String name;
private double gpa;
public static double maxGpa = 4.0;
public static int requiredCredits = 123;
public Student(int ID, String n, double g) {
this.studID = ID;
this.name = n;
this.gpa = g;
}
public int getStudID() {
return this.studID;
}
public String getName() {
return this.name;
}
public void setName(String name) {
this.name = name;
}
public double getGpa() {
return this.gpa;
}
public void setGpa(double gpa) {
this.gpa = gpa;
}
public double getPercentGrade() {
return this.gpa / Student.maxGpa;
}
public static int maxCreditPoints() { (1)
return (int) Student.maxGpa * Student.requiredCredits; (2)
}
}
| 1 | Declaring a class method with static. |
| 2 | The method does not use any instance variables, so it can be declared static. |
1
2
3
4
5
public class Main {
public static void main(String[] agrs) {
IO.println("MAX CREDIT POINTS: " + Student.maxCreditPoints()); (1)
}
}
| 1 | Note we reference the class method directly from the class name. |
MAX CREDIT POINTS: 492
9. Chapter Nine: ArrayList
In Chapter 5 we learned about arrays as a way of storing multiple values in 1 variable. Here we introduce the ArrayList class which does the exact same thing with a couple of advantages.
9.1. Array vs. ArrayList
1
2
3
4
5
6
7
8
9
10
11
12
13
14
15
16
17
18
import java.util.ArrayList; (1)
public class Main {
public static void main(String[] args) {
String[] a = new String[3]; (2)
a[0] = "Sam";
a[1] = "Lisa";
a[2] = "Bob";
ArrayList<String> b = new ArrayList<String>(); (3)
b.add("Sam"); (4)
b.add("Lisa"); (4)
b.add("Bob"); (4)
for(int i = 0; i < b.size(); i++) { (5)
IO.println(a[i] + " " + b.get(i)); (6)
}
}
}
| 1 | We need an import statment before using ArrayList |
| 2 | Regular arrays require a pre-defined length. |
| 3 | ArrayList requires a class type between <>, but no length. |
| 4 | The .add() instance method adds values |
| 5 | The .size() instance method gets the length of the ArrayList |
| 6 | The .get() instance method gets values |
Sam Sam
Lisa Lisa
Bob Bob
9.2. Useful ArrayList Instance Methods
The ArrayList has a lot of handy methods. Below is the list we need for now:
-
.add(Object o) -
.get(int index) -
.set(int index, Object o) -
.remove(int index) -
.size() -
.indexOf(Object o)(requires the class have a propper .equals() method)